Road Tested Recipes: Gingerbread Waffles

Most “gingerbread” flavored waffle or pancake recipes are not good.

There.  I SAID IT.

This is because most of them have simply taken regular waffle/pancake batter and added molasses and some spices to it.  The extra sugar from the molasses makes the resulting waffle/pancakes too dry and sandy.

This recipe, however, has a thicker, moister batter, giving waffles that are cakelike and deeply flavorful.  Using buttermilk stops them from being too sweet, and adds complexity to the flavor.  Make sure to use a thick Belgian-style waffle maker for these; they become flimsy sad little graham crackers as thin waffles.

Whipped cream and sugared berries are a must.

Gingerbread Waffles

  • 4 eggs
  • 1/3 cup sugar
  • 1 cup molasses
  • 1 cup buttermilk
  • 1 tsp. vanilla
  • 3 cups flour
  • 2 teaspoons ground ginger
  • 1 1/4 teaspoons cinnamon
  • 1 teaspoons ground cloves
  • 3/4 teaspoon salt
  • 2 teaspoons baking soda
  • 2 teaspoons baking powder
  • 1/2 unsalted butter, melted and cooled
  • UN-optional whipped cream and fruit

In a mixing bowl, beat eggs until light and fluffy, about 2 minutes.  Add sugar, molasses, buttermilk, and vanilla and mix well.

In a separate bowl, whisk together flour, ginger, cinnamon, cloves, salt, soda, and powder.  Add all this to the wet ingredients and stir until smooth.  Stir in the butter.

You can either cover and refrigerate the batter overnight at this point (it will be very thick in the morning) or cook immediately in a waffle iron, 2-4 minutes.  It will makes around 14 big fluffy gingerbready waffles.

Pie Nap

My friend Angry Baker gave me her personal “Most Likely to Throw a Themed Party” award.  To accept the award, I must pose with my favorite homemade treat; to decline, I must take a nap.

I couldn’t decide:

I AM AWESOME

(The caption is also part of the rules.  Oh, and the nap lasted about .03 seconds, or however long it takes the shutter on my camera to open and close.)

The dessert is Crisp Coconut Chocolate Pie from Martha Stewart Living.  It’s very easy and that filling — whoa.  It’s essentially straight ganache.  To make it:

  • 11 oz. sweetened flaked coconut
  • 1/4 cup butter, softened
  • 8 oz. good-quality dark chocolate (I prefer 50% cacao) chopped
  • 1 1/4 cups heavy cream

Preheat oven to 350 degrees.  Take 1/3 of the coconut and the butter and grind it into a ball in a food processor.  Combine this with the rest of the coconut (use your fingers).  Press this into a pie pan, leaving the top edge fluffy.

Shield the edge of this “crust” with a strip of foil, then bake until center is browned.  (The recipe says this should take 10 minutes, but it took me more like 30 minutes.)  Remove the foil, then bake 10 or so minutes more until the edge of the crust is brown, too.

While the crust cools, make the truffle filling.  Put the chocolate in a bowl; bring cream just to a boil, then pour over the chocolate.  Let the mixture sit for 10 minutes, then stir it with a whisk until it is smooth and combined.  Pour filling into cooled crust, then refrigerate it for at least 1 hour before devouring.  (I like to let it warm on the counter for 20 minutes or so before eating it.)

It tastes like a gigantic Bounty bar, only much, much better.  Here’s a prettier picture of the results:

Oh!  I also just realized that I could have titled his post “Pie Napple.”  This is probably a sign that I need to go to bed.

Summer Eats: Something-for-Everyone Tortellini Salad

Hmm.  Can you guess what Eleanor is thinking?

If you guessed “I’d rather be friends with a racist kangaroo than eat that,” you’d be absolutely right!  It’s a face I’ve become familiar with over the years.  That’s why I like this recipe.  You serve it like this:

Everyone chooses which toppings to put on — or not put on — the top of a pile of tortellini: things like fresh mozzarella, cherry tomatoes, cucumbers, avocados, and other objectionable foods.  Those who want plain pasta can blah it up as they choose.

Grown-ups are rumored to even put a nice balsamic-lime dressing on top of the salad, too.  But that’s just a rumor.

Something-For-Everyone Tortellini Salad

  • 1 pound cheese tortellini (don’t substitute ravioli.  Ravioli, while great in its own floppy way, doesn’t salad-ify as well as tortellini.)
  • 1 pint cherry tomatoes, halved
  • 1/2 fresh mozzarella, cubed*
  • 2 tablespoons chopped fresh basil
  • 1 avocado, cubed
  • 1/4 cup olive oil
  • juice of 1 lime
  • 3 tablespoons balsamic vinegar
  • Salt and pepper

Cook tortellini according to package directions.  Drain and rinse under cool water (if you don’t, the tortellini will glom together in a Starchy Ball of Doom).  Put the tortellini, tomatoes, cheese, basil, and avocado in separate serving bowls.

Whisk together the olive oil, lime juice, and balsamic vinegar.  Add salt and pepper to taste.

To serve, pile some tortellini on a plate, then add other ingredients as desired.

*Fresh mozzarella is the pure white, very soft stuff usually found in the “fancy” cheese sections of grocery stores.  Sometimes it’s packaged as bocconcini — little pre-made balls that you don’t even have to chop.  My kids call these “cheese marhsmallows” — it’s what we used in the photographs above. But you can substitute regular mozzarella if you want.

Summer Eats: Shrimp Cocktail Gazpacho

Oh, the summer eats.  Sure, thanks to imported melons and hothouse tomatoes, you can pretend it’s summertime all year round, but let’s be real: some foods need to be made in season.  (Yes, I’ve become a tomato snob, picking out limp pink specimens from restaurant salads.  Blame the backyard garden.)

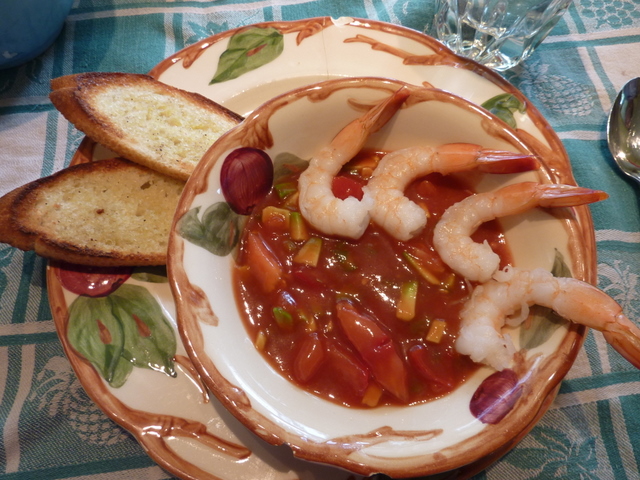
I have a whole collection of recipes that are strictly for summertime only.  Here’s one of them:

This is probably the best thing to do with those frozen rings of shrimp cocktail you can find in supermarkets.  Yes, yes — those weird perversions of Christmas wreaths that come with the little plastic tub of cocktail sauce.  Stop wrinkling your nose at the computer screen.  Have the trust, people — this is full of all sorts of goodies like avocados and lime juice, and you don’t even have to turn on the stove.  (The broiler does come on if you want to make your own parmesan crostini for serving on the side.  Otherwise, just purchase those, too.  You’ll need ’em for scooping all the treats out of your bowl.)

Shrimp Cocktail Gazpacho

Ingredients:

  • One of those Christmas wreath perversions (as mentioned above)
  • 1/2 cup tomato juice
  • 2-3 fresh tomatoes, diced (feel free to substitute cherry tomatoes if that’s what you have)
  • Ripe avcoado, chopped
  • jalapeno pepper, seeds and ribs removed and then minced
  • 1 garlic clove, minced
  • Fresh lime juice (juice of 1 lime)
  • 1/2 red onion, chopped (totally optional.  I really dislike raw onion, so I never put it in.  But perhaps you’re more sophisticated and world-wise than me, and can stand it)
  • Extra cocktail sauce, if you happen to have some lying around
  • Salt and pepper, to taste

Thaw the shrimp by setting it in a bowl of room-temperature water.  Drain it when the shrimp is soft enough to eat.  Refrigerate the shrimp until ready to serve.

Meanwhile, put the tub of cocktail sauce that came with the shrimp in a small bowl.  Add tomato juice, tomatoes, avocado, jalapeno, garlic, lime juice, red onion (really?  Bleh), and stir.  Taste it, then add extra cocktail sauce, tomato juice, salt and pepper to get the flavor combination you want.  I like my gazpacho on the tart side.

Dish up bowls of this heavenly stuff and serve with shrimp and dipping carbohydrate of your choice.

Parmesan Crostini

Ingredients:

  • One baguette.  Go for one that’s more firm than fluffy.
  • 1-2 garlic cloves, halved
  • olive oil, for brushing
  • freshly grated Parmesan (do NOT use the stuff from a can, it won’t melt properly.   But you’re probably a brilliant foodie who’s already munching down on the raw red onion and didn’t need to be told that)

Line a baking sheet with aluminum foil and preheat your broiler.  Slice the baguette diagonally into 1/2″ slices.  Brush one side of the bread slices with olive oil and place them on the baking sheet.  Broil — keeping a close eye on them so they don’t burn — until nicely toasted.

Remove the bread slices from the broiler and carefully flip them over.  Rub cut edges of garlic cloves on the untoasted sides of the bread.  Sprinkle with Parmesan and return to the broiler — once again keeping a close eye on it — until cheese is golden and bubbling.  Let cool slightly before barking at your eight-year-old for swiping pieces when you’re not looking.

Road Tested Recipes: Chocolate Cupcakes

My friend Angry Baker wants to find the best chocolate cupcake recipe in the world.  That’s a darn noble endeavor.  Here’s my contribution.  This recipe was published years ago in Everyday Food magazine.  I make it all the time for parties, and people always ask for the recipe.  That’s known as Good Sign #1.

Good Sign #2 is that this is the only cake I’ve ever seen little kids eat.  Usually they just lick off the frosting and run away.

Good Sign #3 is that this recipe has just as much cocoa powder as there is flour.

You’re on your own with the frosting.  Just promise me you won’t use anything that comes from a can.  Swear it!  Swear upon the King Arthur Flour catalog!

Chocolate Cupcakes
Makes 12 cupcakes.

3/4 cup unsalted butter, room temperature
3/4 cup unsweetened cocoa powder
3/4 flour
1/2 tsp. baking powder
1/4 tsp. salt
1 cup sugar
3 large eggs
1 tsp. vanilla extract
1/2 cup sour cream

Preheat oven to 350 degrees.  Line a 12-cup standard muffin tin with cupcake liners and coat with nonstick baking spray.

In a bowl, sift together flour, cocoa, powder, and salt; set aside.  In a mixing bowl, cream together butter and sugar until light and fluffy.  Add eggs one at a time, then beat in vanilla.  With mixer on a low speed, add flour mixture in two batches, alternating with sour cream and beginning and ending with the flour.

Spoon batter into cupcake pan, filling each cup about 3/4 full.  Bake until it comes out clean 20-25 minutes (my oven runs cold, so I always need to bake it longer.  Use your judgment).  Cool in pan 5 minutes before removing to a rack.

Road Tested Recipes: Fresh Apple Cake

This is it: my hands-down most requested recipe.  For years, my mother has made it for church potlucks, family dinners, and even meetings of the Officers’ Wives Club (back before my dad retired from the army).  I made this cake just this past week for my science fiction/fantasy book group (we read Howl’s Moving Castle), and they all wanted the recipe, so here it is.

It’s a pretty unassuming-looking, humble cake, but once people try it, they usually want more.  I think it manages to be both elegant and down-home at the same time — what more can you ask for?

This cake is moist, dense, and chock full of apples.  As a finishing touch, my mother and I like to add a liberal sprinkling of sugar right when the cake comes out of the oven, making a crunchy crust that contrasts nicely with the chewy interior.

Some people like to add a half cup of toatsed chopped walnuts to the batter.  Those people don’t understand the nature of apple cake.

Fresh Apple Cake

  • four large Granny Smith apples, peeled, cored and chopped
  • 2 cups sugar
  • 1 tsp. baking soda
  • 1 tsp. salt
  • 2 tsp. cinnamon
  • 1 tsp. nutmeg
  • 3 cups flour
  • 3/4 cup oil
  • 2 tsp. vanilla
  • 2 eggs
  • 1/8 – 1/4 cup sugar, for topping

Preheat oven to 350 degrees.  In a big bowl, combine the chopped apples and sugar with a wooden spoon.  Add baking soda, salt, cinnamon, and nutmeg and mix.  Add 3 cups flour and mix well.  (The mixture will seem dry, powdery, and cling to the apples.)

In a large liquid measuring cup, measure out 3/4 cup oil.  Add vanilla and eggs to the oil and combine with a fork or small whisk.  Pour liquid ingredients into the apple mixture and mix very well, using wooden spoon and spatula to scrape sides and bottom of bowl.  Keep mixing until flour is entirely combined — the batter will be very thick, the consistency of paste.  Pour batter into a greased 9″x13″ pan, smoothing top evenly with a spatula.  Bake for 60 minutes, or until center of cake springs back when lightly pressed with a fingertip.  (My oven runs cold, so I usually have to bake this cake for 80 minutes.)

When the cake is done, remove from oven, place the pan on a cooling rack, and immediately sprinkle liberally with sugar for the topping.  My mom likes to pour on enough sugar to make the cake disappear, but I think that’s overkill.

This cake is really, really moist, so all you need to store leftovers is a layer of aluminum foil, although I’ve left it uncovered for the night and found it still moist in the morning.

You can also bake this cake in two round 8″ pans, which lets you put the cake on a fancy glass stand or whatever.  Either way, you’ll find that eating this cake with whipped cream or vanilla ice cream may be a moral imperative for your family.

Road Tested Recipes: Chicken Veracruzana

My friend Valerie keeps an amazing cooking blog called My Life in Food.  It isn’t fancy — there are no textured wallpapers, custom designed banners, or even much photography — but this is why it’s extraordinary: every SINGLE ONE of her recipes is trustworthy.

Valerie’s taste is always elegant and leans towards healthy.  She is fond of Latin and Asian cooking, and while the recipes vary in difficulty, they are all equally delicious.

I made her Chicken Veracruzana last week, and it was quite delish and very easy.  Here’s what the results were:

Not bad, eh?  And very easy to make — you basically layer ingredients in a Crock Pot and let it simmer away.  I only wish we’d had some corn tortillas, like Valerie recommended.  The corn flavor was essential for contrasting with the meaty chicken flavor.  But we ate it up anyhow!  Click on through for the recipe, and enjoy.

Road Tested Recipes: Chilled Avocado Soup with Herbed Breadsticks and Lime Spritzers

I have a deal with my mother-in-law: if she buys the ingredients, I’ll do all the cooking.  On Mother’s Day, I wanted to make something really light and springy for Kathryn, and this is what I chose.  We followed it up with a grilled shrimp salad and finished with angel food cake and strawberry ice cream.  But Brian and I think the soup was the real superstar.

It’s from the book Baby Showers by Gia Russo and Michele Adams, which is out of print.  I’m not necessarily a fan of themed baby showers, but all the recipes in this book are EXCELLENT.  It’s rare that I can say that about a cookbook.  So far, I haven’t found a single dud.

This avocado soup is both refreshing and luxuriant — and best of all, easy to make!  The yield may seem small, but keep in mind that one ladleful is quite enough for one serving.

The herbed breadsticks are a necessary accompaniment, in my opinion — but don’t worry, they’re easy too, owing to using frozen bread dough.

And the spritzers?  That’s known as The Thing My Kids Will Actually Eat.

Chilled Avocado Soup

  • 4 ripe avocados, medium size
  • 2 cups chicken or vegetable stock
  • 1/2 cup cilantro leaves
  • juice of one lime
  • 1/4 teaspoon freshly ground pepper
  • pinch cayenne pepper
  • extra avocado slices and cilantro sprigs, for garnish

Chop avocados into big chunks.  Place in a blender along with stock, cilantro leaves, lime juice, and peppers.  Blend until smooth and creamy (add extra stock or water if it’s too thick).  Place the soup in a big bowl or pitcher and refrigerate until well chilled.  To serve, ladle into bowls, and garnish with extra avocado slices and cilantro sprigs.  Makes about 5 servings.

I suppose you could also swirl some sour cream in there for garnish, if you wanted to be extra decadent.

Herbed Breadsticks

  •  two pounds frozen bread dough, thawed
  • 1 1/2 tablespoons chopped fresh thyme
  • 1 1/2 tablespoons chopped fresh rosemary
  • 1 1/2 tablespoons chopped fresh oregano
  • 2 tablespoons melted butter

Preheat oven to 375 degrees.  Line two baking sheets with parchment paper and grease with cooking spray.  On a lightly floured or cooking-sprayed (is that a word?) surface, knead the herbs into the bread dough.  Divide dough into fifteen pieces, roll into breadsticks, and place on the baking sheets.  Brush each breadstick with melted butter and bake for 15-20 minutes. Makes 15 big breadsticks.

Lime Spritzers

For each serving, you need:

  • juice of one lime
  • 1 tablespoon superfine sugar
  • 10 ounces club soda or soda water
  • ice
  • lime slice, for garnish

In a tall glass, combine lime juice and superfine sugar.  Add club soda and stir until sugar dissolves.  Fill glass with ice and garnish rim of glass with lime slice.

Hooray for Baby Girl

Last Sunday was Katie’s baby blessing.  I’m all in favor of baby celebrations, although they are kind of a cruel joke for a new mother.

“Hey!  You look exhausted!  Why not throw a lavish luncheon for your closest family and friends?”

I never had to uphold this tradition with my first three kids — they were born in Pennsylvania, far from family, and so there was no pressure to play the hostess.  But to tell the truth, I kind of missed having a bit of a party to celebrate my new little ones.  So, with Katie, I decided to throw a party on such a level as to represent the births of all four kids.

Also, it gave me a reason to finally try out some recipes I’ve been had in my To Be Cooked pile for ten-odd years.  I mean, is my cookbook shelf a warehouse, or an vibrant contribution to household information?  (Yeah, that’s the libarian talking.)

Both sets of grandparents were able to be there, as well as all three of my brothers and their significant others.  Cousin June was thrilled to sit with Eleanor and William during church services, and likewise Jeffrey was by Uncle Alex the whole while.

Katie, being the mild-mannered girl she is, was quiet and complacent during her blessing.  Someone (I can’t remember who) said that she spent her time slowly gazing from one face to another during the ceremony.  What a lovely girl.

I can’t quite remember everything Brian said during the blessing, except that it was very touching and sweet.  I just remember one thing: about Katie growing to love her brothers and sister as much as they already love her, so they can all learn and grow from each other.  This has always been my greatest wish for my family, so it was very heartwarming to hear it in Katie’s blessing.

Afterwards, we all trooped over to my house for a splendiferous feast!  Featuring:

Ham

Yellow Pepper Frittata (with artichoke hearts, yum)

Steamed Asparagus with creamy dill dip

Croissants

Fruit Salad with honey-lime-mint dressing

Smoked Salmon Bites!

I put the exclamation point here because this was by far my favorite dish of the day.  They were very easy to make and TASTY.  I know it’s kind of pretentious to use caviar in a dish, but I’ve never done it before and CARPE DIEM.  And the cost isn’t all that bad when you’re only buying one ounce, OKAY?  Here’s the most perfect one I made.  It was consumed shortly after taking this photo:

And for dessert?  Carrot cake, which I’ve been craving for a whole month.  Speaking of which, I think I might go carve myself a leftover slice right now . . .

The post-luncheon entertainment included acrobatics performed by Grandpa and various little grandchildren.  A class act all around.


Baked Beans o’ Doom

This is my mother’s baked bean recipe, and it’s the richest, thickest, yummiest one I’ve ever encountered.  My friend James requested that I give it to him (I brought them to a potluck last month, and he’s been thinking about them ever since), and why not spread the artery-clogging wealth with everyone I know?

These are so rich that I limit myself to only making them once a year, usually for July 4th.  Be wary of the long baking time — 3 1/2 hours — and plan accordingly.

Baked Beans

  • one pound bacon
  • one large yellow onion, chopped
  • 3 cans pork & beans, drained
  • 3/4 cup brown sugar
  • 1/2 – 3/4 cup ketchup
  • 1/4 cup molasses

Preheat oven to 325 degrees.  Fry the bacon until crisp, reserving all the bacon grease.  Let bacon cool, then crumble into bits.  Use 1-2 tablespoons of the reserved bacon grease to cook the onion until soft, about 5 minutes.

In a large lidded casserole dish or bean pot, combine crumbled bacon, onion, beans, sugar, ketchup, molasses, and 1/4 to 1/2 of the reserved bacon grease, stirring until well mixed.

Cover the dish with its lid and bake for 3 hours, then remove lid and bake an additional 30 minutes.  Let cool for a good long while before you eat it; it retains heat well, which makes it great for taking to potluck suppers.